Showing posts with label Apache Amabri. Show all posts

Sunday, March 5, 2017

Configuring and Running Apache Kafka in IBM BigInsights

This blog describes on Configuring and running the Kafka from IBM BigInsights.

Apache Kafka is an open source that provides a publish-subscribe model for messaging system. Refer : https://kafka.apache.org/

I assume that you were aware of  terminologies like Producer, Subscriber, Kafka Brokers, Topic and Partitions. Here, I will be focusing on creating multiple Brokers in BigInsights then create a topic and publish the messages from command line and consumer getting it from the Broker.


Environment: BigInsights 4.2

 Step 1: Creating Kafka Brokers from Ambari

By default, Ambari will have one Kafka Broker configured.  Based on your usecase, you may need to create multiple brokers.

Login to Ambari UI --> Click on Host and add the Kafka Broker to the node where you need to install Broker.


 You can see multiple brokers running in Kafka UI.
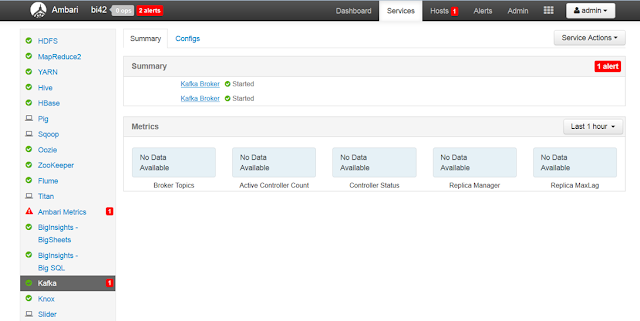


Step 2: Create a Topic

Login to one of the node where broker is running.  Then create a topic.

cd /usr/iop/4.2.0.0/kafka/bin

su kafka -c "./kafka-topics.sh --create --zookeeper localhost:2181 --replication-factor 2 -partitions 1 --topic CustomerOrder"


You can get the details of the topic using the below describe command.

su kafka -c "./kafka-topics.sh --describe --zookeeper localhost:2181 --topic CustomerOrder"


Step 3: Start the Producer

In the argument --broker-list, pass all the brokers that are running.

su kafka -c "./kafka-console-producer.sh --broker-list bi1.test.com:6667,bi2.test.com:6667 --topic CustomerOrder"

When you run the above command, it will be waiting for user input. You can pass a sample message

{"ID":99, "CUSTOMID":234,"ADDRESS":"12,5-7,westmead", "ORDERID":99, "ITEM":"iphone6", "COST":980}


Step 4: Start the Consumer

Open an other Linux terminal and start the consumer. It will display all the messages send to producer.

su kafka -c "./kafka-console-consumer.sh --zookeeper localhost:2181 --from-beginning --topic CustomerOrder"


 Thus, We are able to configure and perfom a sample pub-sub system using Kafka.


Sunday, June 26, 2016

Reinstalling the Services from Apache Ambari

This blog discusses on how to reinstall a component from Amabri. As an example, I have taken reinstallation of Knox.

IT IS RECOMMENDED TO GET PRODUCT TEAM INVOLVED BEFORE RUNNING THE BELOW PROCEDURE. PLEASE DO NOT TRY THIS PROCEDURE ON PRODUCTION CLUSTER DIRECTLY BEFORE TRYING IT IN YOUR DEVELOPMENT CLUSTER.

1) Stop the Knox


Syntax: curl -u admin:admin -H 'X-Requested-By: ambari' -i -X PUT -d '{"RequestInfo": {"context": "Stop KNOX REST"}, "Body": {"ServiceInfo": {"state": "INSTALLED"}}}' http://<AMBARI_IP>:8080/api/v1/clusters/<Cluster_Name>/services/KNOX


[root@bdavm621 nisan]# curl -u admin:admin -H 'X-Requested-By: ambari' -i -X PUT -d '{"RequestInfo": {"context": "Stop KNOX REST"}, "Body": {"ServiceInfo": {"state": "INSTALLED"}}}' http://bdavm621.com:8080/api/v1/clusters/BI_41/services/KNOX
HTTP/1.1 202 Accepted
User: admin
Set-Cookie: AMBARISESSIONID=1th1qyghm8v7vu39twhsrtpli;Path=/;HttpOnly
Expires: Thu, 01 Jan 1970 00:00:00 GMT
Content-Type: text/plain
Vary: Accept-Encoding, User-Agent
Content-Length: 148
Server: Jetty(8.1.17.v20150415)

{
  "href" : "http://bdavm621.com:8080/api/v1/clusters/BI_41/requests/179",
  "Requests" : {
    "id" : 179,
    "status" : "Accepted"
  }
}[root@bdavm621 nisan]#


2) Check the KNOX is stopped

Syntax: curl -u admin:admin -H "X-Requested-by:ambari" -i -k -X GET http://<AMBARI_IP>:8080/api/v1/clusters/<Cluster_Name>/services/KNOX

 If the component is stopped the state will be INSTALLED ("state" : "INSTALLED") in the output.


[root@bdavm621 nisan]# curl -u admin:admin -H "X-Requested-by:ambari" -i -k -X GET http://bdavm621.com:8080/api/v1/clusters/BI_41/services/KNOX
HTTP/1.1 200 OK
User: admin
Set-Cookie: AMBARISESSIONID=1x0zxckld3asbozro4jmw6c55;Path=/;HttpOnly
Expires: Thu, 01 Jan 1970 00:00:00 GMT
Content-Type: text/plain
Vary: Accept-Encoding, User-Agent
Content-Length: 1039
Server: Jetty(8.1.17.v20150415)

{
  "href" : "http://bdavm621.com:8080/api/v1/clusters/BI_41/services/KNOX",
  "ServiceInfo" : {
    "cluster_name" : "BI_41",
    "maintenance_state" : "OFF",
    "service_name" : "KNOX",
    "state" : "INSTALLED"
  },
  "alerts_summary" : {
    "CRITICAL" : 1,
    "MAINTENANCE" : 0,
    "OK" : 0,
    "UNKNOWN" : 0,
    "WARNING" : 0
  },
  "alerts" : [
    {
      "href" : "http://bdavm621.com:8080/api/v1/clusters/BI_41/services/KNOX/alerts/251",
      "Alert" : {
        "cluster_name" : "BI_41",
        "definition_id" : 101,
        "definition_name" : "knox_gateway_process",
        "host_name" : "bdavm621.com",
        "id" : 251,
        "service_name" : "KNOX"
      }
    }
  ],
  "components" : [
    {
      "href" : "http://bdavm621.com:8080/api/v1/clusters/BI_41/services/KNOX/components/KNOX_GATEWAY",
      "ServiceComponentInfo" : {
        "cluster_name" : "BI_41",
        "component_name" : "KNOX_GATEWAY",
        "service_name" : "KNOX"
      }
    }
  ],
  "artifacts" : [ ]
}[root@bdavm621 nisan]#

3) Remove KNOX

Take the backup of the knox config files under /etc/knox/conf.

Ensure all the repo files under /etc/yum.repos.d able to access the corresponding repository. Check the repository is pointing to KNOX setup. If you are using the local mirror repository then you need to start the HTTP Server ( by apachectl start ). This will ensure after you remove the KNOX, you able to install the KNOX.

If all the above prerequisite is met, remove the knoxusing below command.

Syntax: curl -u admin:admin -H "X-Requested-By: ambari" -X DELETE http://<AMBARI_IP>:8080/api/v1/clusters/<Cluster_Name>/services/KNOX

[root@bdavm621 nisan]# curl -u admin:admin -H "X-Requested-By: ambari" -X DELETE http://bdavm621.com:8080/api/v1/clusters/BI_41/services/KNOX
[root@bdavm621 nisan]#

Login to Amabri UI to confirm KNOX is removed from the UI.

3) Remove KNOX RPM's

Login to node where KNOX installed and remove the knox rpm's.

You can use any of the below commands to search the KNOX RPM's.

Syntax for searching rpm's:
yum list installed | grep knox
rpm -qa knox*
yum list installed | grep @ <repoName>

[root@bdavm621 nisan]# yum list installed | grep knox
knox_4_1_0_0.noarch                        0.6.0_TEST_23.4.1.0.0-3.el6  @TEST-4.1


Syntax to remove rpm's : yum remove <rpm_Name>

[root@bdavm621 nisan]# yum remove knox_4_1_0_0.noarch

Run the clean all command :

[root@bdavm621 nisan]# yum clean all

4) Install KNOX from Ambari UI

Re-Login to Amabri UI --> Actions --> Add Services Wizard, select KNOX and install the service again.


Thus, we are able to reinstall the KNOX. You can try similar steps to reinstall other services in Amabri.

Wednesday, November 18, 2015

Creating Ambari Hive Views in IBM Open Platform

This blogs talks on how to create the Amabri Hive Views in IBM Open Platform.

Step 1: Login to Ambari UI, then go to HDFS --> Config --> Advanced --> Custom core-site

Update or Add the property
hadoop.proxyuser.hive.groups = *
hadoop.proxyuser.root.groups=*
hadoop.proxyuser.root.hosts=*


              Save the Configurations and Restart the HDFS.


Step 2: Go to Hive --> Config --> Setting --> Security, set "Run as end user instead of Hive user" as false.


 This will internally add the property hive.server2.enable.doAs to false. Save the Configuration and Restart the Hive.

Step 3: Create the directory under /user/admin under HDFS and provide proper permissions.

[root@rvm ~]# su - hdfs
[hdfs@rvm ~]$ hadoop fs -mkdir /user/admin
[hdfs@rvm ~]$ hadoop fs -chown admin:hadoop /user/admin


Step 4:  Click on Admin --> Manage Ambari --> Views --> Hive --> Create Instance


 Create the instance with the below details and save.


Step 5: Go to the new Hive view Instance and run the queries.


Finally you are able to create Hive Views from Ambari.